Date: 2 February 2010
Venue: MTGM
Result/Report:
The reason I chose to make this poster is to express how beatiful and the variety of emotion and feelings that we can fell in music.
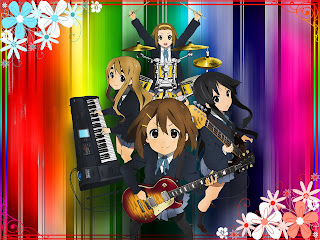
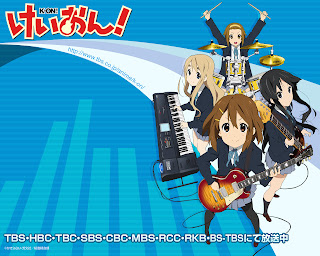
In this poster I chose one of the most popular japanese animation in music, K-ON.
This is poster that I produced:
Music, Colour Of Life
These are the steps I used too make this poster:
Making Colourful Background:
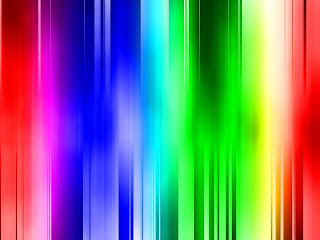

These are the steps I used too make this poster:
Making Colourful Background:

- First off, let's start by creating a new document and applying the oh-so-obligatory clouds (Filter > Render > Clouds).
- Now that we have our base to work with, apply Mezzotint (Filter > Pixelate > Mezzotint) with type "Long Strokes."
- Doesn't look like much right now, but with the magic of motion blur (Filter > Blur > Motion Blur), with an angle of 90 degrees and a distance of 999 for the settings, everything will be better.
- Now add a new layer and overlay some color over it. Here I chose the Rainbow Gradient using the Gradient Tool (G), but you can choose whatever suits you. When you have a layer of color, set the layer mode to Overlay.
- If you feel like being creative, you can tweak some more by changing the curves (Ctrl + M) to make the image either brighter or gloomier depending on the mood.
- Now create a new layer. Then select the Marquee Tool (M), set it to elliptical, and the Feather to 30, and select around the picture (use the example below for reference). Then select inverse (Ctrl + Shift + I), and fill (Edit > Fill) with black. Then change the Opacity to 75% so that it is a bit more subtle.
- Again create a new layer, and with the same Marquee tool settings as above, select (use the example below as reference). Then change the curve (Ctrl + M) to something like in the example. Afterward, change the Opacity to 60% so that it isn't blinding. Try to be creative and change the settings to your taste.
- Now we are done with the background. Save the layer, eg: Background.psd

- Open or drag the image into Adobe Photoshop
- Choose the Rectangular Marque Tool at the task box
- Then drag the image that we wanted by using the marque tool
- Copy the chosen image (Ctrl + C)
- Choose the background tab and paste it (Ctrl + V)
- The copy image will be label as Layer 2
- Next, I use the magnetic lasso tool to mark all the point of the area that I wanted to keep and make sure the point was both the first and the last joint was together.
- Next press Ctrl + Shift +I, to inverse the mark area.
- Then using the Magic Wand, choose and erase the unwanted area.
- We can use the eraser to erase some unwanted image that can't be erase by magic wand
Image Resources:
http://www.tbs.co.jp/anime/k-on/
Finishing The Poster:- In this phase, firstly, adjust the image the image that I cropped earlier according to the suitability of the image.
- Next, by using the burn tool ( press O) apply the tool around all the edge of the image so it look more darker on every edge of the image of the Layer 2
- On the Layer 2, press the right click on the mouse and chose blending options.
- Then chose drop shadows.
- In this poster I applied some border such as:

- In this poster, I applied two of the border and put it opposite to each other. One the border, I change the colour by Image > Adjustment > Hue and Saturation.
- Finally, I applied another border that surround the image and by using blending options, I use Gradient overlay to change the colour of the border.
- That's all from me......Enjoy.


0 comments:
Post a Comment